

Lately, lip piercings, like bite piercings, have become really popular. Among them, the spider bites piercing brings a fresh and exciting twist to the lip piercing style.
What is a Spider Bites Lip Piercing?
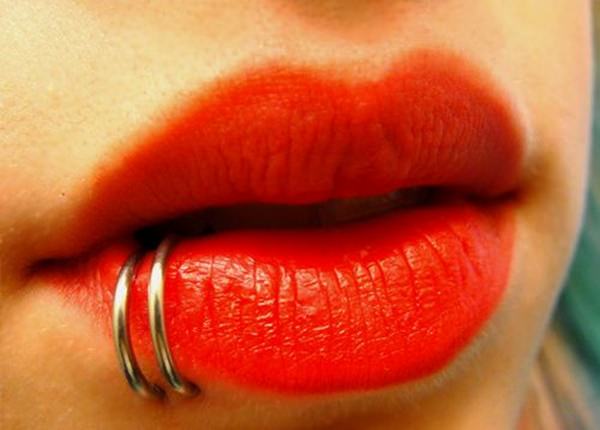
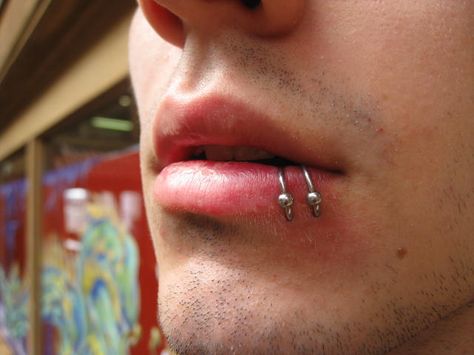
The spider bites lip piercing involves having two piercings very close to each other on one side of your lower lip. This makes them look like spider bites, hence the name.
Let’s talk about how spider bites piercing is done, what you should be careful about, what you can expect after getting spider bites piercing, and how to know if there’s a problem.
These two piercings are done under the lower lip, next to each other, giving the impression of spider bites. It’s a good choice if you want a cooler pierced look that’s not as obvious as other lip piercings like the shark bite or cyber bite piercing.
Just like with any lip piercings, you have to think about your mouth’s health before getting spider bites piercing.
The way the spider bites piercing is placed might make the jewelry rub against your gums and teeth, which could lead to problems later on.
The seriousness of these issues depends on your mouth’s shape and how much the jewelry touches your teeth.
Before you go for a spider bites piercing, it’s important to understand what problems might come up and how to prevent them. Here’s a guide that covers everything you should know about getting a spider bites piercing.
How Much Does Spider Bites Piercing Cost?
For your spider bites piercing, the cost usually falls in the range of $40 to $80. It’s crucial to locate a skilled piercer who can position the piercing in a way that minimizes potential harm to your teeth and gums.
This is particularly important if you have uneven teeth – in such cases, finding a piercer with the right expertise becomes even more essential.
On the less expensive side, anticipate a starting price of $20 to $40, and then add the cost of the jewelry you choose.
If you opt for a more specialized piercer, the cost could go up to $80 or more, excluding the expenses for the jewelry.
Spider Bites Piercing Procedure
To do the spider bites piercing, your piercer will follow these steps:
Cleaning Your Lips: They’ll clean the outside of your lips using warm water and a special disinfectant.
Making Tools Clean: The needles, jewelry, and other tools they’ll use will be really clean and germ-free.
Marking the Spot: They’ll mark where the jewelry goes on your lips using a special pen to avoid skin problems.
Starting the Piercing: A clean needle will be gently put through your skin to make the first hole.
Adding the Jewelry: The jewelry you picked will be put into the new hole they made.
Stopping Any Bleeding: If there’s a bit of bleeding, they’ll take care of it and clean up.
Doing the Same for the Other Hole: They’ll repeat steps 3 to 5 to make the second hole.
Cleaning at the End: Finally, they’ll clean the outside of your lips again to make sure you don’t get an infection.
By doing these steps carefully, the spider bites piercing will be done in a safe and precise way.
Spider Bites Piercing Pain – How Much Do Spider Bites Piercings Hurt?
Everyone has a different pain endurance.
For some people, spider bites piercing might not be a big deal (they might even find it exciting!). But for others, it could feel quite sharp or uncomfortable during or after the process.
In general, those who have gotten this piercing say it’s a bit like getting a shot, like when you get a vaccine. You might feel a quick pinch, and then your skin might be a little sensitive or sore.
If you’ve had your ears or nose pierced before, some people say spider bites piercing hurts more than an ear piercing but less than a nose piercing. Each individual piercing won’t hurt too much.
To give you an idea, it might hurt more than getting your earlobe pierced, but it hurt less than getting your nose pierced. Keep in mind, though, that you’ll be getting two piercings really close to each other, so the pain might add up a bit.
If you don’t handle pain very well, you might want to wait a few days between getting each piercing.
Spider Bites Piercing Healing Process
The healing process for spider bites piercing typically spans from around 4 to 12 weeks. Keep in mind that the exact duration can vary for each person.
By consistently following proper aftercare routines throughout the entirety of the healing period, you might potentially promote a quicker healing process.
It’s worth noting that appearances can be deceiving – even if your piercing seems fully healed, it might not be completely so.
To be on the safe side, it’s a good idea to consult your piercer before you consider discontinuing your aftercare practices. Occasionally, regardless of your best efforts in aftercare, your body might necessitate additional time to fully mend itself.
Potential Side Effects
Like with any piercings, there are potential side effects of spider bites piercing that you might come across, including:
Allergic Reactions: Your skin might react to the materials used in your jewelry, such as nickel, causing an allergic response.
Piercing Accidents: If your piercing gets caught on clothes or objects, it could be torn or ripped out of your skin.
Infections: If you don’t take care of the piercing correctly or if the tools used by your piercer aren’t properly sterilized, you might end up with an infection.
Embedding: If the jewelry is too small and sits too close to your skin, the skin might grow over it, causing embedding.
Migration and Rejection: Sometimes, your body might push the jewelry out of the pierced area, causing the jewelry to fall out.
Nerve Damage: If the piercing isn’t done correctly or is too close to sensitive nerves, you could experience nerve damage.
It’s important to be aware of these possible issues and to take proper care of your piercing to minimize the risks.
Precautions to Follow
Before getting a spider bites piercing, consider these precautions:
Keloid Scars History: If you’ve had keloid scars before, it’s best to avoid this piercing.
Irritation Awareness: Be aware that eating or drinking might cause irritation to the piercing.
Mouthwash Rinse: Prior to getting the spider bites piercing, rinse your mouth with a gentle mouthwash.
Risk of Rejection: Due to the thin and sensitive nature of lip skin, there’s a chance of piercing rejection.
Piercer Choice: This piercing doesn’t demand specialized training beyond basic piercing certification. However, ensure you pick a piercer with positive reviews and a proven record of successful piercings.
Spider Bites Piercing Aftercare
Healing a spider bites piercing is not more complicated than healing other lip piercings types.
Most problems that can happen are connected to your mouth, like not keeping it clean, accidentally biting the jewelry and damaging your teeth, or not cleaning out food bits from the healing piercing.
Healing a spider bite piercing on your lip is similar in complexity to other lip piercings.
Most problems can come up because of things related to your mouth, like not keeping it clean, accidentally biting the jewelry and hurting your teeth, and not getting rid of leftover food around the piercing.
Here are some things you can do to help it heal better:
Use salty water to clean your mouth: Like how you clean a new piercing with salt water, do the same for your lip. Do this at least twice a day to get rid of the bad stuff. Also, you can use a salt water mouth rinse to clean the back of the piercing and your mouth.
Try a gentler toothpaste: The toothpaste you normally use might make your piercing feel uncomfortable, especially at the start. So, use a milder one, like bubblegum-flavored toothpaste for kids.
Eat soft foods: Lip piercings can make you accidentally bite your jewelry because it’s bigger at first. To prevent that, eat foods that are easy to chew and won’t hurt your piercing.
Pierce the side you don’t sleep on: Even when you sleep, you need to take care of your new piercing. Your pillow has germs, and pressing your piercing against it can cause problems. So, if you usually sleep on one side, get the piercing on the other side. This way, you can take care of it even while you’re asleep.
Here are some simple things to do and avoid after getting the piercing, so it heals well and looks good over time.
| DOs | DON’Ts |
| ✅Keep the piercing covered with a bandage, and change it at least once a day. | ❌Avoid touching your piercing right after eating or with unwashed hands. |
| ✅Wash your hands with warm water and soap before touching your piercing. | ❌Refrain from engaging in oral s*x until the piercing is completely healed, especially if your partner has any s*xually transmitted infections (STIs). |
| ✅Use distilled water and saline solution to rinse your piercing two times a day. | ❌Do not use antiseptic or alcohol rinses to clean the piercing. |
| ✅Gently pat the piercing dry with a clean towel after rinsing. | ❌Avoid removing or playing with your jewelry until the piercing has fully healed, which usually takes around 1 to 2 months. |
| ✅Make sure to keep the piercing dry while you’re taking a bath or shower. | ❌Make sure your facial hair doesn’t get caught in your jewelry. |
| ✅Be cautious when putting on or removing clothes, hats, or helmets that go near your piercing. |
When to See a Doctor
If you see any of these things, it’s important to go to a doctor:
Pain or puffiness near the piercing
The skin around the piercing is really warm
Pus or yucky stuff that’s green or yellow
The weird or stinky smell from the piercing
Red bumps or a rash close to the piercing
Jewelry falls out soon after getting it, especially if it’s tough to put it back
Teeth getting hurt by the jewelry or plaque building up near the piercing
How to Prevent a Spider Bites Lip Piercing Infection?
Do Not Touch Labret/Lip Piercing
To start, avoid touching your labret piercing or any other lip piercing you might have. Our hands aren’t always perfectly clean, and even if they appear to be, bacteria (or even viruses) can likely land on our fingertips.
Given that piercings act as open wounds, there’s a potential for infection if you handle the piercing. We also suggest refraining from moving the jewellery post around or taking it out.
Do Not Remove Lip Jewelry From Un-healed Piercing
We recommend avoiding removing the post until the wound is fully healed. If you believe it’s necessary to remove it, it’s best to consult a doctor or get in touch with the professional piercer who performed the piercing originally.
Trying to remove the post from a fresh piercing at home isn’t advisable, as you might lack the proper equipment and knowledge.
Moreover, attempting this could lead to further tissue damage around the piercing. If you’re unable to contact the piercer, your best course of action is to see a general practitioner or visit an emergency room.
Wash Your Spider Bites Piercing Daily
Another method to ensure the well-being of your lip piercing is to be diligent about cleaning it daily. While we understand that the mouth contains bacteria, it’s important to remember that this is a wound that requires regular cleaning.
For freshly pierced lips, gently wash the area using a saline solution or a cleansing product recommended by your professional piercer.
Spider Bites Piercing Jewelry
One cool thing about lip piercings is that they can hold many different types of jewelry.
To get that cool fanged bite style, many people choose flat disc labret studs. These simple bead ends look like the marks left by venomous fangs. You can find beads in all sorts of styles, like gemstones, charms, and even spikes.
Hoops that are level with the lip make it seem like you’ve got the fangs. Smooth hoops give a sleek look, while rings with a bead in them add a fancy touch to this style.
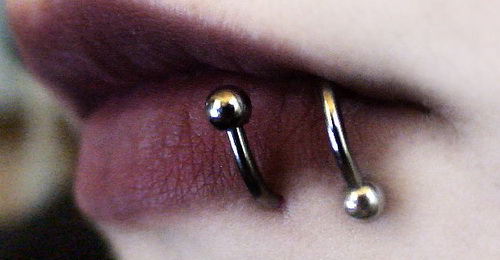
If you want a mix of both looks, circular barbells are a great choice. These are perfect if you really want your snake bites piercing to stand out.
For a totally special look, you can also try twister barbells.
Hoops are the usual, and liked the choice for spider bites piercings. But there are also other cool options to consider:
Circular barbell: It’s like a thick ring that looks like a horseshoe, and you can remove the round beads at each end.
Captive bead ring: This one is thick and totally circular, and it has a round bead in the middle. The two ends of the circle snap together.
Curved barbell: This is a bit curved and looks like a bar. It has round beads on both ends.
Who Shouldn’t Get A Spider Bite Piercing?
Your oral health is the biggest challenge for your new lip piercing.
If you can’t follow the piercing aftercare instructions, don’t brush your teeth two times a day, or if you have a history of oral health problems, it might be better to get a piercing somewhere else.
Wearing lip jewelry for a long time can lead to issues like gums moving back and wearing down the protective layer on your teeth. If you already have these problems, then lip piercings might not be the best choice for you.
More Body Piercings
Double Nose Piercing: A Complete Guide
Nose Piercing 101: Everything You Need to Know
Getting Your Ears Pierced at Target (Through Rowan)
Ashley Piercing Scar: Every Thing you Need to know About Ashley Piercing Scarring
The Labret Piercing: Everything You Need To Know
Everything You Need to Know About Vertical Labret Piercing
Do You Want a Bottom Lip Piercing?: A Complete Guide
Horizontal Lip Piercing – Ultimate Experience Guide
The Medusa (Philtrum) Piercing: Everything You Need To Know
Conclusion
In conclusion, lip piercings, particularly spider bites piercings, have gained popularity recently. Among various lip piercing styles, the spider bites piercing brings a unique and exciting twist to the scene.
The spider bites lip piercing involves having two piercings very close together on one side of your lower lip, resembling spider bites. This guide discussed the process of getting a spider bites piercing, potential risks, aftercare, and suitable jewelry options.
It’s important to remember that while spider bites piercings can look really cool, taking care of your oral health is crucial. If you can’t follow the aftercare instructions or have a history of dental problems, you might want to consider a different type of piercing. Also, remember that wearing lip jewelry for a long time could affect your gums and teeth.
Whether you’re interested in the fanged bite aesthetic or the overall edgy look, understanding the process, risks, and aftercare will help you make an informed decision about getting a spider bites piercing. Always prioritize your health and well-being when considering body modifications like piercings.
Frequently Asked Question on Spider Bites Piercing
What is a Female Spider Bite Piercing?
Female spider bite piercing is situated on the lips, specifically the lower lip area of an individual. It is commonly positioned near the corner of the lip, either on the right or left side. In actuality, it consists of a pair of distinct piercings placed in close proximity to each other along the lower lip.
How Long Does it Take for Spider Bites to Heal Piercing?
Spider Bites piercings usually require around 6-10 weeks for complete healing if you follow the proper aftercare instructions. To promote a speedy and trouble-free healing process, adhere to these uncomplicated guidelines: Refrain from smoking and consuming alcohol, as they might irritate the piercing and lead to inflammation.
What is the Difference Between a Spider Bite and a Snake Bite Piercing?
Spiderbite piercings consist of a pair of closely spaced piercings located on a single side of the lower lip. In contrast, snakebite piercings involve two piercings that are positioned at a greater distance from each other, with one on either side of the lower lip.
How Painful is The Spider Bite Piercing?
Spider bites piercing pain varies. Some find it exciting, while others feel discomfort. Comparable to a shot, with quick pinch, mild sensitivity. Close piercings could slightly increase pain. Consider spacing piercings if pain-sensitive.


