
How to Test a Fuse With a Multimeter
Do you want to know How to Test a Fuse With a Multimeter? Also, did you know that electrical circuits have some cool things going on? One of those things is the fuse. It might be small, but it plays a key role in keeping the devices safe.
Imagine this: you have a device at home or in your car that’s not getting any power. It could be because of a problem with the fuse box. So how to tell if a fuse is blown and is causing the issue?
I’ll show you a few simple steps to test a fuse using a multimeter. It’s a handy tool that helps us check if a fuse is still good or if it needs to be replaced.
Let’s jump right in and learn how to test a fuse with a multimeter like a pro.
How Do Fuses Work?
Fuses are actually pretty cool. They’re these simple components that do a really important job in electrical circuits. Their main job is to protect the circuits from something called power surges or overloads.
Inside a fuse, there’s a little metal string or wire. When there’s too much electrical current flowing through the circuit, this metal string is like, “Whoa, slow down!” and it melts or “blows.” It’s kind of like a superhero move to save the day.
Fuses have different abilities to handle current, and we measure that using something called ampere rating. It’s like a measure of their strength.
Ampere ratings can be as low as 10A or as high as 6000A, depending on the fuse. So, it’s like some fuses can handle more current than others.
Now, one type of fuse you might come across is the cartridge fuse. It’s kind of like a little cylinder and can be see-through. It’s got these metal tabs at each end. Inside, there’s that metal string we talked about earlier.
When there’s too much current, the metal string is like, “I can’t take it anymore!” and it burns out, breaking the connection and stopping the electricity from flowing.
To sum it up, fuses are like these awesome protectors in electrical circuits. They sacrifice themselves to save our devices from getting too much electrical current. They’re like the heroes that keep our stuff safe.
Common Fuse Problems
Blown fuses
The most common problem that can occur with fuses is when they blow.
It happens when there is too much electrical current flowing through the circuit, and it can cause the fuse to break and interrupt the flow of electricity. It’s like a safety mechanism that prevents damage to the electrical system.
Loose fuses
Another issue is when fuses become loose. This can happen if the fuse isn’t properly inserted into its socket or if the wires connected to the fuse aren’t securely tightened. When fuses are loose, they may not be able to maintain a stable connection and can cause electrical problems.
Corroded fuses
Fuses can also suffer from corrosion over time. Corrosion is when the metal parts of the fuse start to deteriorate due to exposure to moisture or other factors.
When fuses become corroded, they can become weak and eventually break, disrupting the electrical flow.
Damaged fuses
Fuses can get damaged for various reasons, such as physical impact, excessive heat, or electrical surges.
When a fuse is damaged, it may not be able to properly protect the electrical system and can lead to issues with the devices or circuits it is meant to safeguard.
Improperly rated fuses
Fuses are designed to handle specific amounts of electrical current. If a fuse with an incorrect current rating is used, it can cause problems.
For example, if a fuse with a lower rating than required is used, it may blow too easily and interrupt power even when there’s no overload.
On the other hand, if a fuse with a higher rating is used, it may not provide enough protection and could allow excessive current to flow, potentially damaging the electrical system.
Tools Required to Test a Fuse with a Multimeter
To test a fuse, you will need the following:
- Multimeter
- Fuse puller for car fuses
How to Test a Fuse with a Multimeter
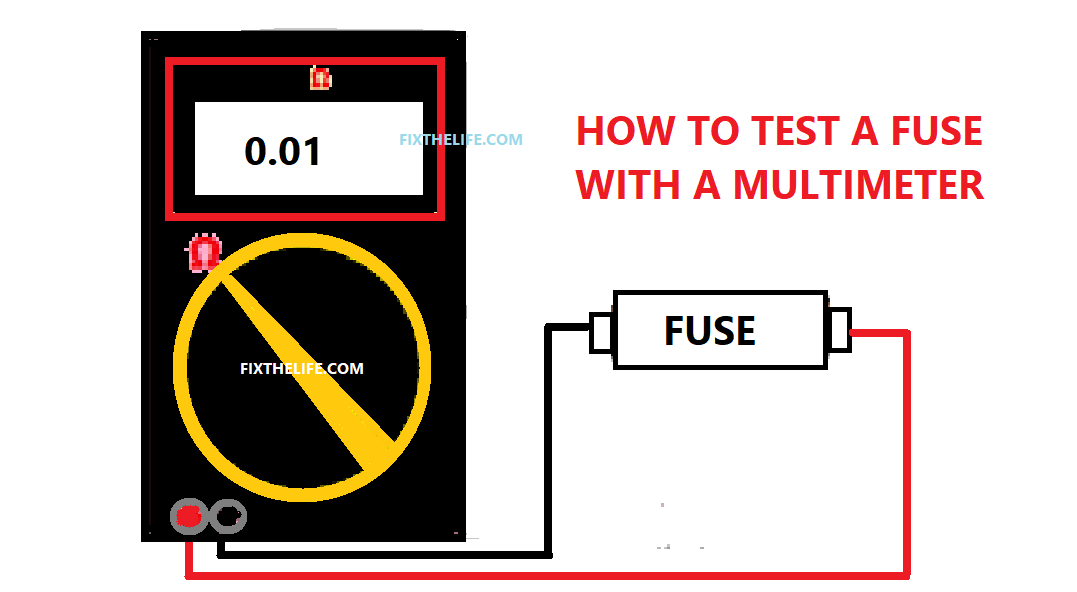
To test a fuse using a multimeter, start by setting the multimeter to the 200 Ohm range to measure resistance.
Then, place the negative and positive probes of the multimeter on each end of the fuse and wait for a reading of zero (0) or a value close to zero, indicating that the fuse is still good.
If you see an “OL” reading, it means the fuse is bad and needs to be replaced.
Now, lets get into detailed steps to test a fuse using a multimeter.
Step 1: Take Out The Fuse
The first thing is to take out the fuse from the electrical circuit. This might be different depending on the device or fuse, but be careful not to damage it while removing it.
And always remember to turn off the power before doing anything to stay safe.
Step 2: Set The Multimeter To Ohms
Set the multimeter to the Ohms setting, which is a way to measure resistance. It’s like checking how easily the electricity can pass through the fuse.
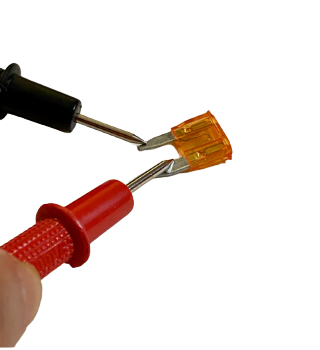
Step 3: Place Multimeter Probes On Each End Of The Fuse
Now, take the multimeter probes and touch them to each end of the fuse. It doesn’t matter which probe goes where; we’re just checking if the fuse is working properly.
Step 4: Assess Results
Look at the reading on the multimeter. If it shows a value close to zero or zero itself, that means the fuse is good.
It’s letting the electricity flow through it as it should. But if the multimeter shows a high number or the letters “OL,” it means the fuse is bad and needs to be replaced.
By following these steps, you can test a fuse using a multimeter. Be careful, turn off the power, and always seek professional help if needed. It’s important to stay safe and make sure your electrical devices are working properly.
How to Test Car Fuses With A Multimeter
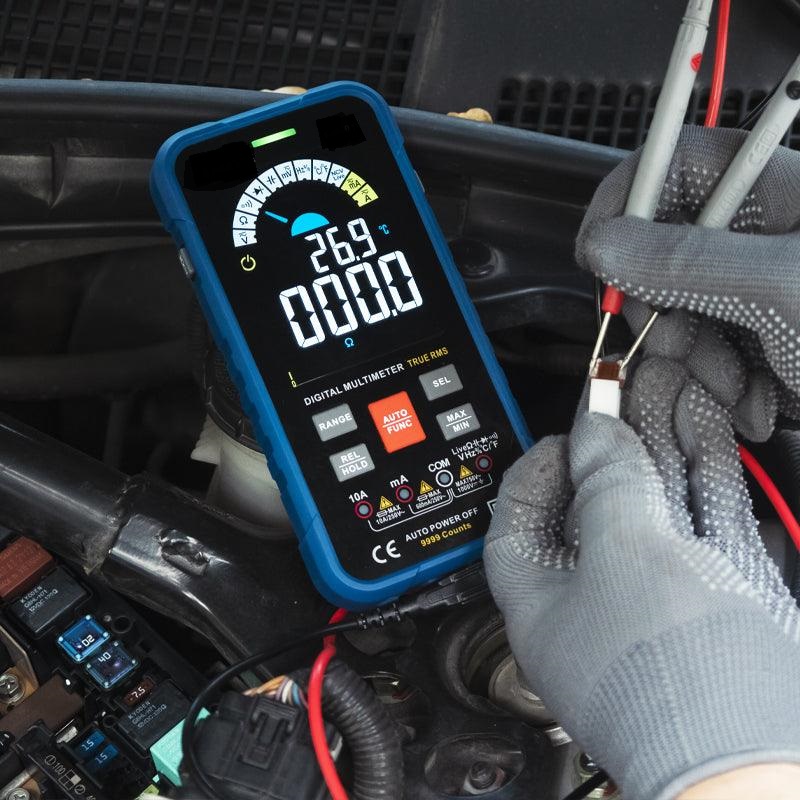
Car fuses have a different shape compared to regular fuses. Instead of tabs, they have these “blade” thingies on the sides. You can find them in a fuse box in your car.
So, if something in your car isn’t working, you might have a blown fuse. Below are the steps to check:
- Make sure your car is turned off. Look at your car’s manual or fuse diagram to find the right fuse for the device that’s not working.
- Use a fuse puller or be really careful and remove the fuse by hand.
- Take a close look at the fuse. Check if it has any dark spots or if the metal strip inside is broken. If you see any of these, it means the fuse is no good and needs to be replaced.
- If it looks okay, you can use a tool called a multimeter to test it. Set the multimeter to the 200 Ohm range (it’s like a measurement setting).
- Put one end of the multimeter on one side of the fuse and the other end on the other side. Make sure they touch the metal parts.
- Now, check the multimeter’s screen. If it shows zero or a number really close to zero, or if it beeps, it means the fuse is still working fine. But if it shows something else like “OL” or any other number, it means the fuse is bad and needs to be replaced.
When you replace a fuse, always use a new one that has the same ampere rating as the old one. This rating tells you how much current the fuse can handle. Using the wrong rating can cause problems, so be sure to match them up.
Why Should You Test Your Fuses Regularly?
If you’re experiencing issues with your car’s electrical system, it’s time to check the fuse box. Fuses can wear out or get damaged over time, causing various electrical problems.
The good news is that you can easily test your fuses using a multimeter. Regularly testing your fuses is a simple yet important task that can help you prevent more significant issues down the line.
So, make sure to prioritize this task and test your fuses today to keep your car’s electrical system in top shape.
How To Test A Fuse With A Multimeter
Testing Fuses With multimeters:
Prepare Your Multimeter

First, let’s set up the multimeter for testing fuses. Connect the black lead to the common socket and the red lead to the ohms (Ω) socket. Since we’ll be measuring ohms, turn the dial to the ohms setting.
You can choose a range like 2000M. To make sure the multimeter is working properly, touch the metal tips of the leads together. The multimeter should show a reading close to zero, indicating it’s functioning correctly.
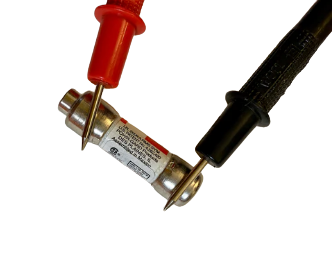
Testing a Fuse With a Multimeter
To test a fuse, make sure there is no power running through it. Take the metal tips of the multimeter leads and touch them to the opposite ends of the fuse.
Remember, fuses are not picky about which tip goes where. If you’re testing a glass fuse, look at it closely to see if the wire inside is intact and the fuse is clear.
If everything is good, the multimeter reading should be similar to when the metal tips were touching (close to zero). But if the fuse is blown, the multimeter reading will be different, showing a “1” or “oL” (open loop) depending on the type of multimeter.

- Blown Fuse: 1 or oL (exact number when tips are not touching)
- Good Fuse: Near to 0 (exact number when tips are touching)
Testing a Midget Fuse
Testing a midget fuse is pretty much the same as testing a glass fuse. Take the metal tips of the multimeter leads and touch them to the opposite ends of the midget fuse.
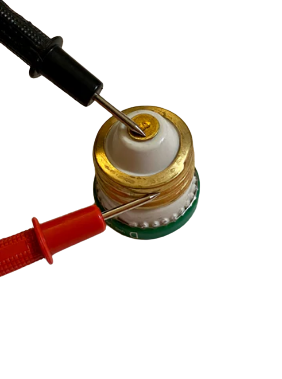
Testing a Plug Fuse
In some older homes, you may come across plug fuses or screw fuses. These fuses often have small windows on top, allowing you to check the internal wire visually.
If the wire looks broken or the glass is blackened, it means the fuse is blown. However, a multimeter can get a more accurate result.
Flip the fuse upside down and touch one multimeter leading to the top metal part and the other leading to the threaded metal sides.
Testing an Automotive Fuse
For automotive fuses, you can start by visually inspecting them. Look for a small wire inside the colored part of the fuse that connects the two metal blades.
If the wire is broken, it means the fuse is blown. To test it with a multimeter, take the metal tips of the multimeter leads and touch them to the two metal blades of the automotive fuse.
Remember, testing fuses is an important skill in troubleshooting electrical problems. Always be cautious, make sure there’s no power, and follow the instructions carefully.
Recommendations
What is A Starter in A Car? Purpose, Limitations, & When to Replace a Car Starter
Final Words by Fix The Life
In conclusion, testing fuses with a multimeter is a straightforward process that can help identify faulty fuses in electrical circuits. By setting up the multimeter correctly, touching the metal tips of the leads to opposite ends of the fuse, and observing the multimeter reading, one can determine if a fuse is blown or functioning correctly. This simple technique allows for efficient troubleshooting and ensures electrical systems’ safety and optimal performance.